Put Some Tape On It!

photo

A few weeks have now passed since making my defiant declaration – that it was officially time to get off my rear end and start gearing up for this triathlon business. And in these few weeks, all of the old spots that have been giving me trouble over the years – shoulders, low back, glutes, knees, and ankles – have been reminding me that I can’t just wake up one day and swim for an hour, run 6 miles, or bike another 25 just because the moment strikes. This only leads me to one conclusion – and I’m sure the rest of you TeamZ-er’s can attest – that if you don’t use it, you lose it. Jimmy Connors once said that, and he played professional tennis, beating men half his age, until his retirement at age 42. A true hero to all lefties like me.

In the context of triathlon training though, I should amend this notion by saying, use it efficiently and properly, or lose it … or less dramatically, experience some painful joints after a workout. Case in point: After our first group Saturday swim workout at the Asphalt Green Aqua Center – a sweet perk which comes with being linked to the triathlon through our Alzheimer’s Association charity group – my left shoulder was feeling like a container of Jell-o that had an arm attached to it. Mind you, I was able to hang tough for the first half of the class, but once we started practicing our overhead stroke technique, pain started to set in with nearly every sweep underneath the water. The post-swim sauna and/or steam in another 90 minutes couldn’t come sooner!

But what do pain and discomfort have to do with efficiency or proper mobility? An important lesson I’ve taken from my chiropractic education is that when certain muscles – be they stabilizers, prime movers, or antagonists – fail to do their job properly, other muscles can spring into action to help compensate for the others’ lack of activity while performing the necessary function of the joint, or joints in question.

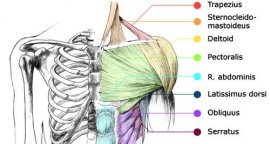
Knowing my own shoulder and past injury history – or lack thereof – this wasn’t an internal joint derangement or degeneration process causing my pain. I had full and painless range of motion, both passive and active, in all major directions. However, pain was felt upon resisted range of motion, which is indicative of something happening at the muscular-tendon junction. With me, I was feeling pain at the along the rounded side and front edges of the shoulder – basically where the rotator cuff muscles attach. While these muscles act to perform abduction, internal rotation, and external rotation of the shoulder, their chief concern is enforcing stability by keeping the head of the humerus (arm bone) centered within the shoulder socket, also known as the glenoid cavity. Tight pectoral muscles, which is what I have, can cause the shoulder and scapula (the shoulder blade) to roll forward during activity and rest, putting extra pressure on the rotator cuff muscles and tendons while they’re doing their job. Coupled with the tight pect’s in the front, I also have weak, or inactive scapular stabilizing rhomboid and latissimus dorsi muscles – especially on the left – which are also contributing to the cuff insertion pain.
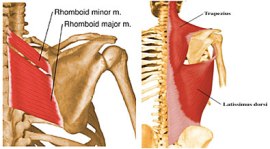
image004 tp-pec

So aside from just chopping my arm off and calling it a day, what was I to do about this pain? After all, I had a softball game to play the next day and I’m the pitcher! Granted, I pitch underhand, so the mechanics are somewhat different than the overhead motions of swimming, but the principles discussed in the past few paragraphs still remain the same: I need my shoulder complex to be in the right position, with all structures acting the way they’re supposed to. Apart from the ice applied in 20 minute intervals after the swim, as well as stretching out my pect’s, I incorporated a method of rehabilitative care which has been gaining lots of traction and attention in recent years: Kinesiology Tape.

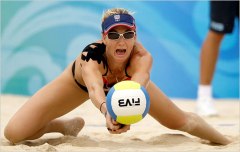
If you’re an avid Olympics watcher like me, you’ve no doubt seen the duo of Kerri Walsh/Misty May Treanor spike their way to consecutive beach volleyball gold medals while wearing this type of tape on their shoulders. Novak Djokovic won a US Open wearing kinesio tape too.
kinesio_Keri_Walsh Screen_shot_2011-08-31_at_10.35.45

Kinesiology tape serves many functions and possesses several benefits in its application:

-sensory stimulation of muscle activity via nerve receptors on the skin
-improved fluid dynamics by gently lifting the skin off the connective tissue covering muscles
-helps to normalize muscle tone and activation for proper movement
-postural correction
-pain relief
-you look pretty bad ass in competition

Lucky for me, I had just taken a course in getting certified in the application of one tape in particular called Rock Tape, so I had the basic idea down of what to do.

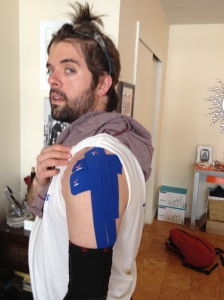
DISCLAIMER: It is very hard to tape yourself 100% perfectly – as evidenced by the makeshift job you see on my shoulder above – so make sure you have a buddy nearby to tape you. It is also critical that you follow the specific directions, like with pre-positioning a joint prior to taping, or with taping from either muscular insertion to origin, or origin to insertion. The direction in which you tape could lead to muscular activation (O-I) like I needed with my rhomboids and lat’s, or muscular inhibition (I-O) like I needed with my pect’s.

END RESULT: A personal best 7 strikeouts en route to our team’s first win of the softball season.

MORE END RESULTS: Enhanced self awareness of postural incorrectness, activation of some sleepy shoulder blade muscles, loosened pect’s, and (relatively) pain-free workouts and pitching outings – both with and without tape.

Definitely check out the Rock Tape website: they’ve got loads of instructional videos, where you can buy the tape, and even where to find certified “Rock Doc’s” near your home or office. Also, if you’re a swimmer, or someone who engages in athletic activities where your shoulder is needed, you should check out this video I found on Youtube yesterday made by the good people at FINA – the international governing body of ALL that is aquatic sports. This video covers some basic core exercises – as the core is where one draws a lot of their upper extremity strength and mobility from – as well as rotator cuff and scapular stabilizing exercises that are easy to perform, yet so effective.

Check your posture. Check your range of motion. Listen to your body. Rock On!

-Matt Z – Certified “Rock Doc”

The Time Is Now


I know what you’re thinking – “where’s this week’s healthy recipe with accompanying pictures?!” …”Who gave this strange-looking dude permission to post something?!”

To answer said queries, first allow myself to introduce … myself. My name is Matthew Zimmerman – the ghost editor-in-chief of this blog and the other half to TeamZ. Some would say the better, more handsome half, but don’t tell Vicki that’s what the people on the street are saying.

Even though I am quite handy in the kitchen, and even more adept at holding Vicki’s various food items in the perfect position for the right picture, I will not be posting fun food recipes and pictures for your viewing pleasure. I will, however, utilize: 1) my knowledge of the human body – how it works, what makes it hurt, and how to make it un-hurt; 2) past experience in training for a 5-day, 250 mile off-road bike in Israel, the 2011 NYC Triathlon, 2011 Tough Mudder, and the 2012 NYC Marathon; and 3) current literature and expert opinion on how to “maintain” while gearing up for athletic feats, ranging from a 5k to our triathlon … all in an effort to educate and inspire you fine people, and maybe engender a few laughs along the way – at my expense of course.

So as indicated in the title above, it’s time: Time I got off the couch and hit the training circuit; Time I started to speak on the subjects listed in the previous paragraph; and Time I started to opine on what’s happening throughout this training process. The picture above was taken 3 weeks ago in the elevator ride down to our building’s gym to partake in the first of many of these workouts – initially drawn up by my chiropractic classmate, and personal trainer friend, Joe Van Wagner, when I was getting ready for the Tough Mudder 2 years ago.

This workout hurts, plain and simple. It is not for the faint of heart and takes a good 30-45 minutes to get through. But when all is said and done, you’re left feeling like you can break through walls and climb mountains – that is until the next morning when you can’t get out of bed because everything hurts, including muscles you didn’t even know existed: Serratus? …  Quadratus? … Obliqus?? .. Who are you and who invited you to this gym session?! This program is not meant for everyday usage, especially if you’re gearing up for something like a triathlon where there’s plenty of other disciplines to worry about (hint: if you ever imagined a world where being in a pool is the anti-fun, then this is it). But it’s good for those days during the workout training week where focusing on strength – shoulders/arms, core, glutes (yes, there’s more than one kind of glute), hammies and quads – is the key to making sure that you can get through the daunting swim-bike-run combo, or any endurance challenge for that matter, in one piece.

I went ahead and did this workout – felt like crap the next 4 days of course – but since its  incorporation into my weekly training schedule, the after effects are barely noticeable with next-day recovery achieved.

Stay hydrated, don’t forget to stretch the right way both before and after a workout, and pour yourself a nice tall glass of chocolate milk after your workout: “Sweet for Sweat” as I like to say.

Next time, I’ll talk about the first swim training session, my ailing shoulder, and benefits of taping.

Thanks for reading, and enjoy your workout!

-Matt Z.
 

ABC (Avocado+Banana+Coconut) Vegan Ice Cream

OK I have to admit I belong in Ice Cream Addicts Anonymous. I can seriously eat ice cream every day – snow or sunshine.  In an effort to limit all of the preservatives I consume with store bought ice cream, I decided to make my own unprocessed version.  Sorry Edy’s slow churned – I know you will be losing a lot of business.

What was the inspiration behind the ingredients? Simply, things I had around the apartment.  Here is a tip: buy a bunch of bananas, peel, and freeze.  I almost always have bananas at hand to throw into smoothies or other banana-related items.  As for the avocado, I watch a lot of Iron Chef America (best show ever) and they always seem to be putting things you wouldn’t expect in the ice cream maker. So why not avocado? let’s start adding some healthy fats to our ice cream!

Kitchen Gadgets: Here at the TeamZ Ponderosa, we seem to be collecting kitchen gadgets by the minute.  We may need to leave NYC because we will soon outgrow our kitchen.  I guess that is why we have space under the bed right?! So I made this recipe 2x once with an ice cream maker and once without.  It came out awesome even without the ice cream maker- I promise. I had it taste tested by cousin Andrew and BFF Atara (and of course the hubby- but he likes everything I make..or at least that’s what he’s contractually obligated to say).  Without the ice cream maker it has more of an ices texture, while the ice cream maker creates a more lasting creamy feel and appearance.

Ok enough talk. Here is the recipe.  As you can tell I am super passionate when it comes to my ice cream.

Ingredients:

  • 1 avocado- pit removed
  • 2 frozen bananas
  • 1 13.5 oz can of unsweetened coconut milk
  • 2 tbsp agave nectar
  • zest from 1 lemon
  • 2-3 tbsp lemon juice
  • chocolate chips

Instructions:

  • Place all ingredients in blender (except for chocolate chips)
  • Once blended transfer to ice cream maker and follow manufacturer instructions
  • Mix in chocolate chips
  • Transfer to air tight container and place in freezer

If you do not have an ice cream maker – after blending transfer to air tight container and place in freezer.  Remove from freezer about every 30-45 minutes and stir with spatula or whisk.  Keep checking and stirring periodically until frozen. The pictures were taken of the non-icecream maker version.

xoxo Ice Cream Addicts

Having fun with Water

IMG_7298IMG_7319

IMG_7356

I think most of us know that drinking water is mucho importante`. Although I find a glass of ice water refreshing, it also can get boring.  There are so many ways to make water more exciting and dress it up – you know, with a little extra panache and color!  Friends and family that have been to my house for a meal know that I seldom put a pitcher of plain water on the table. This blog post features some of my favorite water additions which not only add some fun flavor and color, they also bring some extra nutrients and vitality.

Water + Lemon + Thyme: Thyme has a minty and lemony flavor and pairs perfectly with freshly sliced lemon. Fresh thyme is also quite replete with Vitamins A & B6, Zinc, Folate & Manganese. For the full skinny on thyme, click here.

Water + Cucumber + Orange: This combo has been a huge hit in the TeamZ house.  Cucumber is loaded with Vitamin K, which is necessary for proper blood coagulation and essential for proper metabolic activity of bone growth and strength maintenance. And apropos of the charity for which we are running the triathlon, Vitamin K may play a role in the pathogenesis of Alzheimer’s disease by limiting damage to vital neuronal processes. Click here for more nutrition facts on Cucumber!

Seltzer + Blueberry + Mint: There’s nothing wrong with water having some bubbles, right? This mix is perfect for a picnic outside, as the mint adds some freshness, while the blueberries add a delightful mix of sweet and tartness. Blueberries are loaded with beta carotene antioxidants, which if you may or may not know, help rid the body of harmful free-radicals that can stick around in the body to cause inflammation, degenerative body changes, and even cancers.

IMG_7379

Spring is in the air and we are spending more time outside in the sun and working out.  It is important to make sure to stay hydrated with plenty of cold water – especially with adding some of the above ingredients because they can certainly help aid any and all activities in which you’re partaking!

How do you like to dress up your water?

xoxo Team Z.

My Mother’s Zesty Meringues

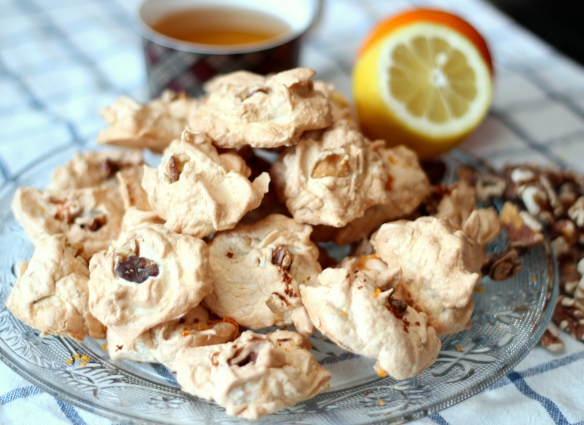
I went to my parents house for the last days of Passover. When I entered I immediately was hit with the aroma of delicious foods…with a hint of sweetness.  The sweetness was coming from my mother’s famous meringues, which were just coming out of the oven. What impeccable timing!

Here is the recipe, which happens to be super easy and quick:

Ingredients

4 egg whites

3/4 cup granulated sugar

1-2 tbsp lemon juice

1 tsp vanilla

1 tbsp ground walnuts

zest from 1/2 lemon

zest from 1/2 orange

Instructions:

Step 1: Preheat Oven to 300 F

Step 2: Coat a large bowl with lemon juice – the acid content helps with whipping up the egg whites.

Step 3: Place egg whites, vanilla, lemon juice, lemon and orange zest in large bowl and beat until soft peaks form.

Step 4: Gradually beat in sugar, until stiff and glossy peaks form.

Step 5: Fold in ground walnuts, but careful not to over mix!

Step 6: Using a spoon, dollop meringues in 2-inch mounds onto an un-greased parchment paper lined baking sheet.

Step 7: Optional: to garnish place 1 toasted walnut in each meringue before baking.

Step 8: Bake 25-30 minutes and then let cool on rack.

xoxo ending passover with mom’s meringues.

Apple Stuffed Acorn Squash

I was watching Giada De Laurentiis on the Food Network (completely addicted) and she was making this gorgeous looking apple and cheese golden crusted pie.  I wanted a bite so badly so I decided to make my own healthy version of the brilliant apple + cheddar combo.  I think I would be much skinnier if I did not watch this channel…or Giada. How does she stay so skinny by the way?!

Ingredients:

– 1 Acorn Squash

– 1 Granny Smith Apple cored and thinly sliced ( I did not peel but I recommend peeling)

– 1/2 cup coarsely grated cheddar cheese

– 1 tbsp sesame seeds

– 1 tbsp coconut oil

– 1 tbsp olive oil

– 1 tsp agave nectar

– 1 oz dried cranberries

– pinch of cinnamon

– pinch of nutmeg

– salt & pepper

Directions:

Step 1: Preheat oven to 425.  Cut acorn squash in half and use a fork to scoop out the seeds and stringy stuff in the center of each half. Coat the inside of each half with olive oil and sprinkle with salt & pepper. Place on a baking pan – cut side down – and bake for 25 minutes or until golden brown.

Now lets get to working on making the filling deliciousness!

Step 2: Heat the sesame seeds on a dry pan over medium heat – shake the pan intermittently. Once seeds start to darken remove from heat and set aside.

Step 3: Melt the coconut oil over a low flame in your pan.  Coconut oil has many health benefits including improving your digestive system, immune system, blood sugar control and much more. So get excited to infuse your dish with this super power ingredient!

Step 4: Increase flame to medium heat and toss in apples, dried cranberries, cinnamon, nutmeg, and agave nectar. Mix until apples are nice and soft (Approx. 8 minutes).

Step 5: Your acorn squash should be finishing up just about now.  Remove from oven and place on plate.  Scoop apple filling into center of each half of squash.  Add the cheddar cheese, which will melt just from the heat of the squash and apples!  Sprinkle with sesame seeds.


Now take your fork and dig in!

Xoxo getting our fall on

Run, Skip, Run, Bound – Repeat.

And so the triathlon training begins.

I am definitely feeling the pain of having taken the winter off from working out.

Tonight we met up with coach Mike of Asphalt Green Tri Club and the butt- kicking began almost immediately – a brisk run from the Engineers Gate at 90th & 5th down to the Boathouse at 72nd St. where we met up with Coach Neil for the real workout..

Tonight’s training run, which took place on “Cat Hill” – a stretch of the Central Park loop on the east side – had us alternating between running, skipping, (running again!) and bounding up the hill – twice each! – while we focused on getting our heels off the ground on the way down. And to top it off, we had to run as fast as we could up and down the hill after the 2 sets of R-S-R-B … you know, just for good measure.

Why hill train?

Training on hills is good for improving leg muscle strength, strengthening hip flexors and Achilles tendons, quickening your stride, and keeping your heart in check. It is important to combine strength training with regular running, as doing so will reduce the risk of running- related injuries.

Tips:

-Watch your posture – keep your body upright and try not to lean forward

-Run lightly – make sure your feet are not pounding the ground

By the end of the workout I think I burned off all the matzah I had consumed and really felt the burn in my calves and thighs – oh, hello forgotten muscles!

Recovery Food:

Coaches orders were to have a glass of chocolate milk within 30 minutes of your workout.  We went with coconut water and a broccoli pattie with an egg (shh don’t tell Coach Neil). The point is, your muscles need the protein for recovery.

Find a hill and get your run on … and if you can’t get to a hill, just simply increase the incline on the treadmill.

Good luck!

This is what I looked like by the end

xoxo loving/hating hills

(pictures for tonight taken with my iPhone)

We Are Not Bunny Rabbits: Running Tips

As you may have guessed by looking at the pics on our blog- one of our favorite non-food hobbies is running.

running

We like to go out and run together but the truth is we end up doing our own thing- Matt runs at a faster pace, and when I run with him my competitive side tries to keep up causing me to tire out sooner.

I started running in 2011 by joining NYRR and participating in the races.  I love the energy of a race- even it is only a 5k. Also time seems to fly when you are in a race rather than running on a treadmill. I started at literally 0 and with practice and dedication built myself up to doing the 2012 NYC Half Marathon.   I would love to do a marathon but I have hip injuries and don’t think it is a good idea to put the stress on my bad hips.  So instead I am doing a triathlon ahhh (hence the title of our blog Tri-ing).  We will eventually blog more about why we are doing the triathlon this year.

I went to the Tri-mania event in NYC where I picked up a couple of tips on how to improve my running.

Thought I would share

1. Focus on your cadence- this is how often your feet touch the ground.

slow cadence= longer time in the air and harder land on the ground= not nice to your joints!

faster cadence= lest time in the air and softer land = happier joints

Goal: 90 steps/minute (180 steps/minute if counting both feet)

2. Do not over stride- this means landing each step with the heel out in front of you. Instead your foot should land directly underneath you.

3.  Set the treadmill incline to 1 percent- this more closely mimics running outdoors.

4. Strengthen your butt!

5. Take out your ear phones and listen to your run- your feet should not be pounding the ground.

6. We are not bunny rabbits- we should not bounce up and down with our hair flailing in the air- fast cadence and no over stride is key.

7. Change out those sneaks every 6 mths.

8. Strengthen your core- plank it!

9. Video your run and play it back slowly so you can see how you run and pinpoint areas where improvement is needed.

10. Breathe- sounds simple but I actually forget to do this sometimes.  In through the nose and out through the mouth.

11. *** Have Fun****

xoxo not a bunny rabbit